Who doesn’t like a LAN party? And if it is with long-time buddies in a Minecraft setup, the excitement gets doubled up, isn’t it? But the situation can go really wrong if the Minecraft LAN is not working. And it can be for several reasons.
Enabling the network discovery option and updating the game itself can resolve the LAN error in Minecraft. Besides, you should also disable Windows Defender, Firewall, or any third-party antivirus. You can disable the third-party mods and AP isolation to check if the issue still persists.
However, you can easily sort out this error in a few simple steps if you can identify the root cause of this problem. But, before we reveal all those steps, let’s understand the root causes.
Table of Contents
How To Host Minecraft Server In LAN?
The LAN network error can trigger in Minecraft if you haven’t set up the host server in the proper manner. So, follow these steps to correctly initiate a LAN server to negate the cause of this error from the root.
- Step 1: Launch the game and select the “Play” button on the welcome screen.
- Step 2: Select the “Multiplayer” button and click on the “Create a new world” option (you can also join the existing one).
- Step 3: Come back to the “Multiplayer” menu and enable the “Visible to LAN Players” option.
- Step 4: Click on the “Play” button to launch the server (click the “Create” button at the older versions of the game).
Once you have set up the server, ask other users of the same network to go to the “Multiplayer” mode and find the LAN server you have just created and connect to it.
What Can Be The Primary Reasons If Your Minecraft LAN Is Not Working?
There can be multiple reasons why your Minecraft can’t connect to the LAN server, especially on the Windows systems. But considering a broad spectrum, this issue can mainly trigger for five reasons.
- The server (LAN) computer and the native computers are on different networks (either “Private” or “Public” network).
- The “Network Discovery” option is turned off on the host computer.
- If you are using any router, the access point isolation feature is turned on and blocks the connection in the background.
- Windows Firewall aborts the incoming connections from other systems on the same network.
- Antivirus software is interfering with the LAN connection.
Network bug is not the only error that frequently triggers in Minecraft, as many people also reported having graphical bugs, such as a broken bow or a flickering background. In such cases, you can follow our step-by-step guide to repair broken bows in Minecraft on the Windows system.
4 Quick Fixes For The LAN Error In Minecraft
There are several fixes if your LAN server is not showing up in Minecraft. But before you resort to any advanced methods that need some serious tweaks, try these four simple ways that solve the network issues in most cases.
1. Update Network Driver
LAN issues mainly trigger when you have a faulty network driver or an obsolete one. You can quickly fix this by updating the network driver on your Windows system.
- Step 1: Right-click on the “Windows” button on the bottom-left corner of your screen.
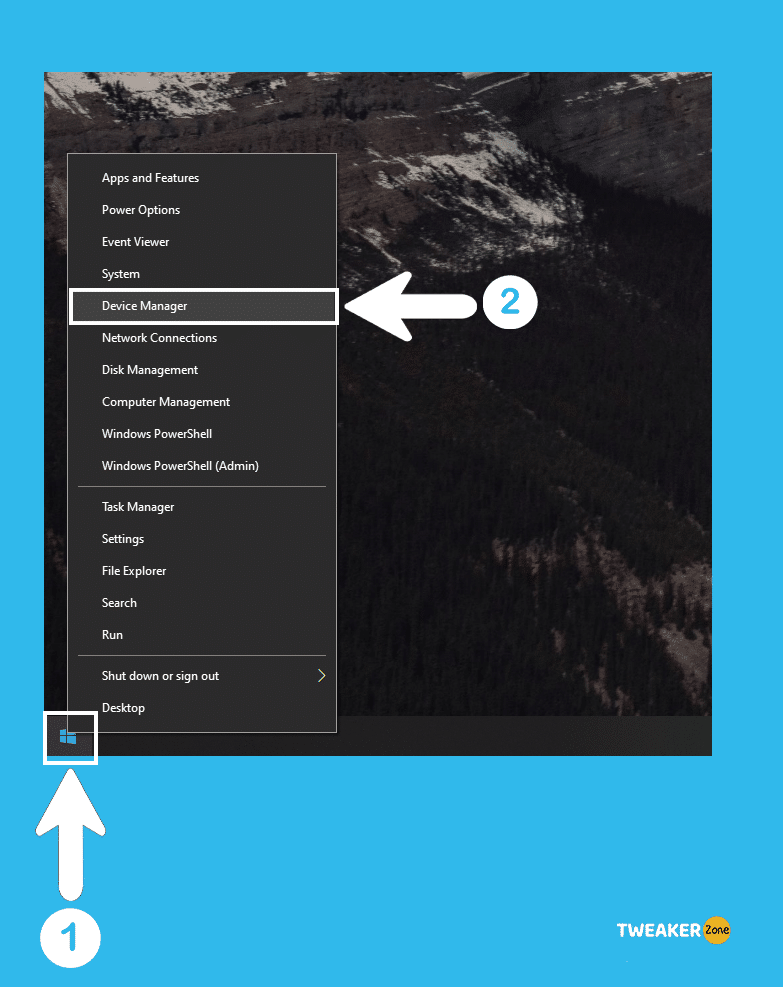
- Step 2: Click on the “Device Manager” option to launch the utility window.
- Step 3: Scroll down and double-click on the “Network Adapters” option to expand it.
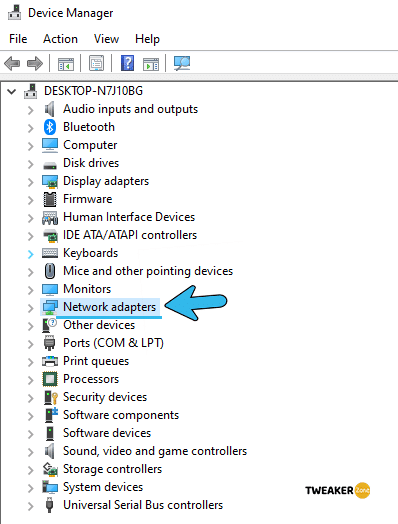
- Step 4: Navigate to your network driver and right-click to expand the options.
- Step 5: Select “Update Driver” from the menu and then click on the “Search automatically for updated driver” option.
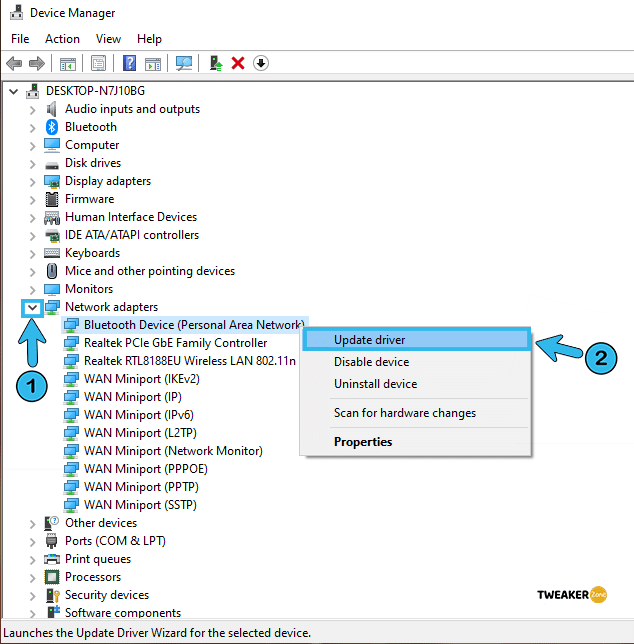
- Step 6: Follow the on-screen option and reboot your system once the updating process is completed.
If you do not have an active internet connection, you can also manually download the recent update files from the official site of your network driver. But during the updating process, choose the “Browse my computer for drivers” option and manually select the update file.
2. Turn On Network Discovery
If your Minecraft LAN world is not showing up, you may have knowingly or unknowingly disabled your network discovery. So, you should also turn on the discovery option again to solve this error.
- Step 1: Click on the “Magnifying Glass” icon located at the bottom-left corner of your taskbar.

- Step 2: Once the search bar appears, type “Control Panel” and hit enter.
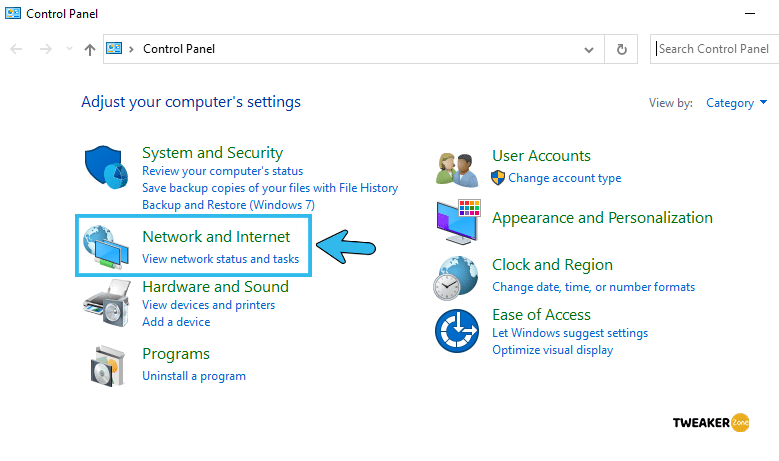
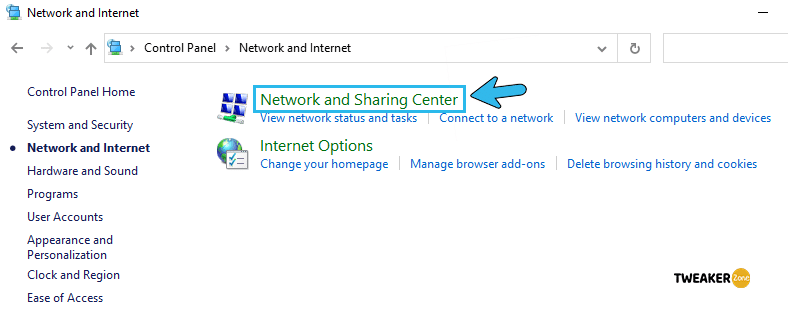
- Step 3: Navigate to the “Network and Internet” button to launch the menu and click on the “Network and Sharing Center” option.
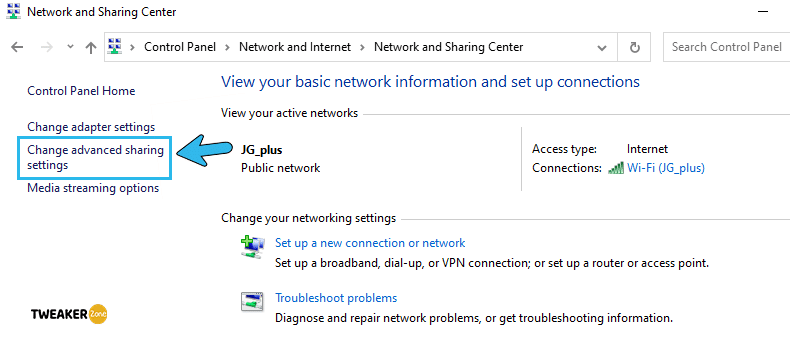
- Step 4: Once the new window opens up, click on the “Change advanced sharing settings” option from the left side panel.
- Step 5: Click on the “Private” profile to expand it and tick the box besides the “Turn on network discovery” option.
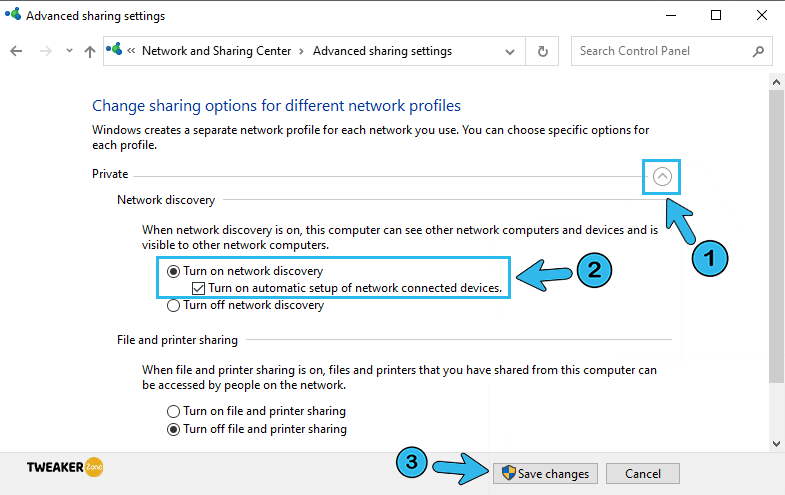
- Step 6: Tick both the boxes beside the “Turn on File and Printer Sharing” and “Allow Windows to Manage Homegroup” options.
- Step 7: Click the “Save Changes” button to save the settings and relaunch your game.
In many cases, your LAN icon may prompt a yellow triangle to denote an unidentified network after you turn on the network discovery option. In such a scenario, follow our step-by-step guide to Fix Minecraft Not Responding Error in Windows.
3. Temporarily Disable Windows Defender
Windows Defender is a pre-installed security system on any Windows device. It assures not only robust security and safety parameters but also restricts unknown applications from making contact with your system. But you may need to disable it temporarily to check if it is causing any interference with the LAN network.
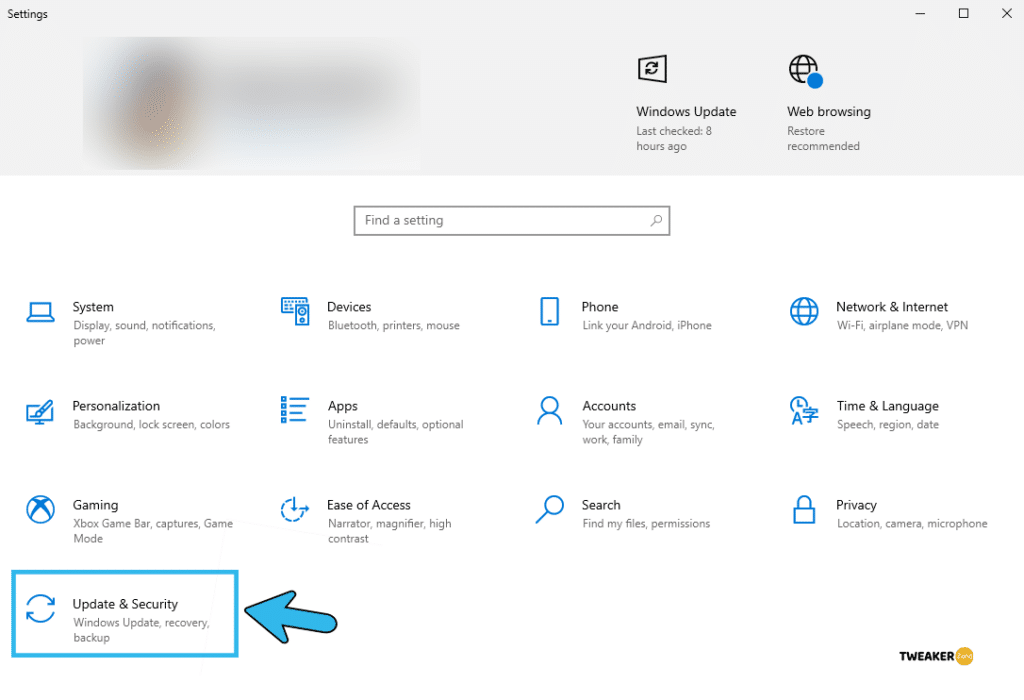
- Step 1: Press “Windows Key + I” to launch the “Settings” app on Windows devices.
- Step 2: Scroll down and click on the “Update & Security” option.
- Step 3: Once the new window opens, click on the “Windows Security” option from the left column.
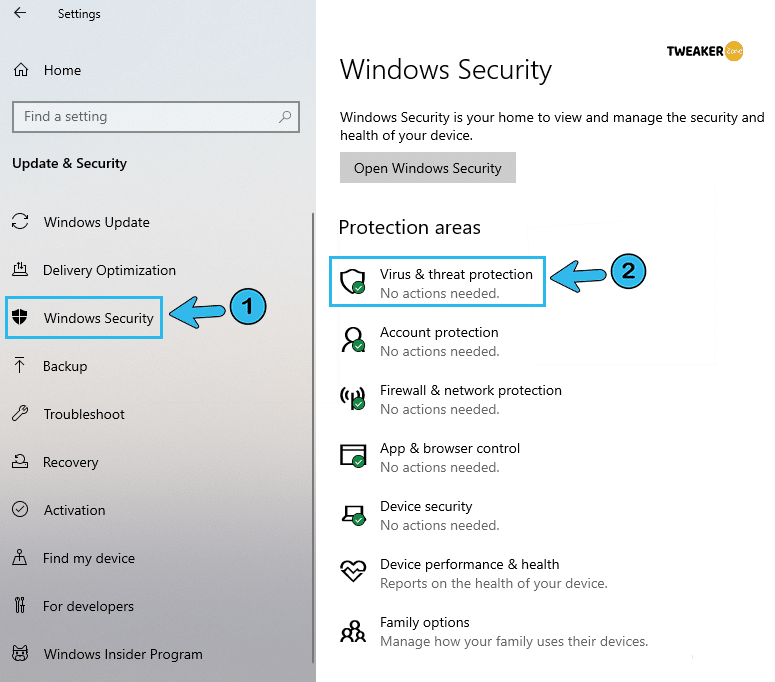
- Step 4: Click on the “Virus & threat protection” option on the main panel.
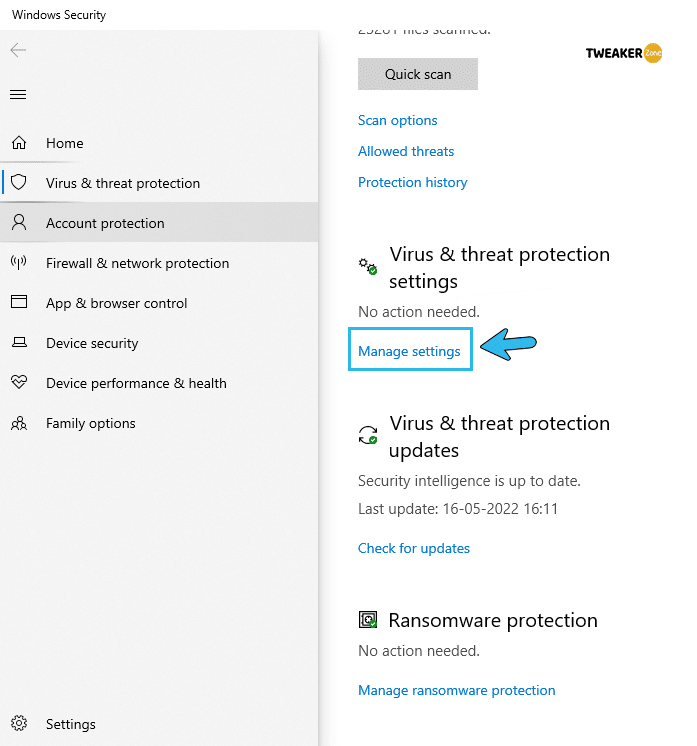
- Step 5: Once the new window appears, click on the “Virus & threat protection settings” option.
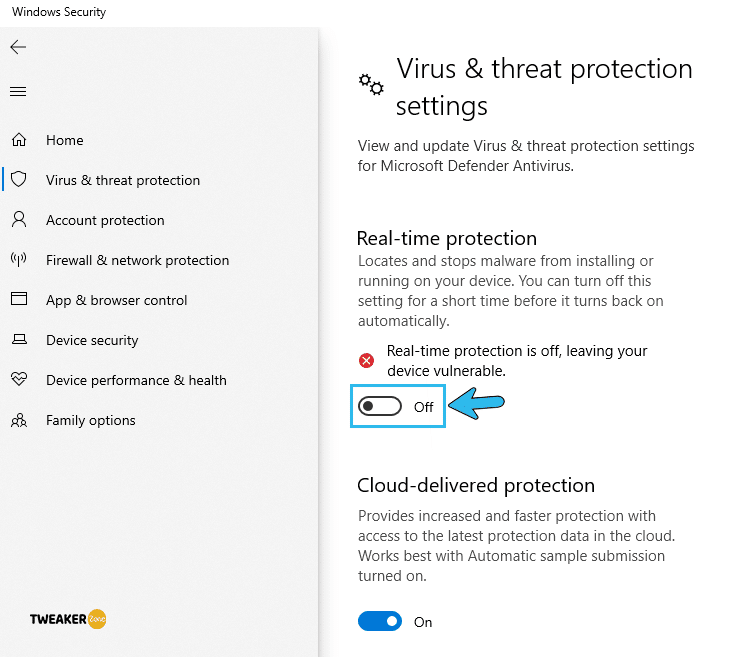
- Step 6: Navigate to the “Real-time protection” option and toggle off the button beside it.
- Step 7: Relaunch your game and try to connect to the LAN server.
4. Use The Latest Minecraft Version
Although it has been available for a very long time, Minecraft is still not flawless and has several bugs. But Mojang developers release newer updates at timely intervals to fix those bugs. So, whenever a new update is available, you should install it on your Minecraft version too.
- Step 1: Click on the “Minecraft Launcher” to launch the app and log in to your account with proper credentials.
- Step 2: Navigate to the “Edit Profile” option located at the bottom-left corner.
- Step 3: Once the profile editor window opens, click on the “Use Version” menu to expand it.
- Step 4: Select the latest Minecraft version from the drop-down menu and click the “Save Profile” button.
- Step 5: Exit to the main game window and try to reconnect to the LAN server.
Visit the official site of Minecraft and note down the latest version. You can also force-update the game if you can’t find that version on the drop-down menu.
6 Advance Fixes For The LAN Error In Minecraft
If you are still in doubt why LAN is not working in Minecraft even after trying the basic troubleshooting options, your problem may be way more deep-rooted than you think. In such cases, follow these pro-methods to fix the error.
5. Reinstall Minecraft
If you face LAN issues even after using the latest version of Minecraft, your installation file itself may be corrupted. In that case, you need to completely uninstall and then reinstall the fresh copy.
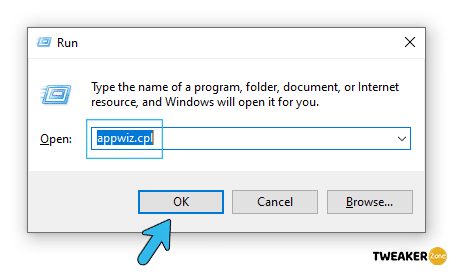
- Step 1: Launch the “Run” command by pressing the “Windows Key + R” together.
- Step 2: Once the pop-up box appears, type “appwiz.cpl” and hit enter to open the “Programs and Features” window.
- Step 3: Scroll down and right-click on the “Minecraft” option to expand the additional menu.
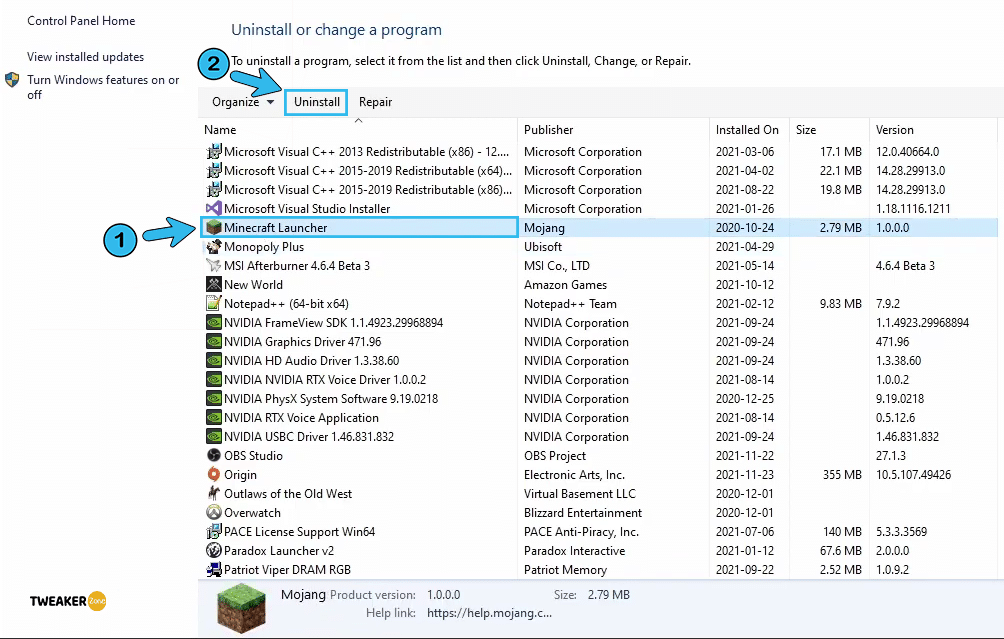
- Step 4: Select “Uninstall” from the list and follow the on-screen instructions to delete the game completely.
- Step 5: Once the uninstallation procedure is over, press the “Windows Key + R” together again.
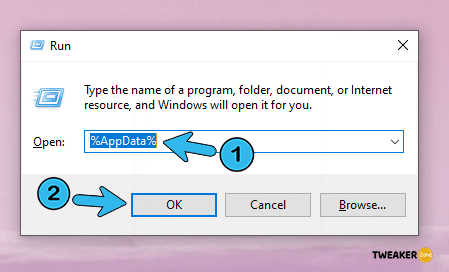
- Step 6: Type “%appdata%” and hit enter to open the “Roaming” folder.
- Step 7: Scroll down and select the “.minecraft” folder.
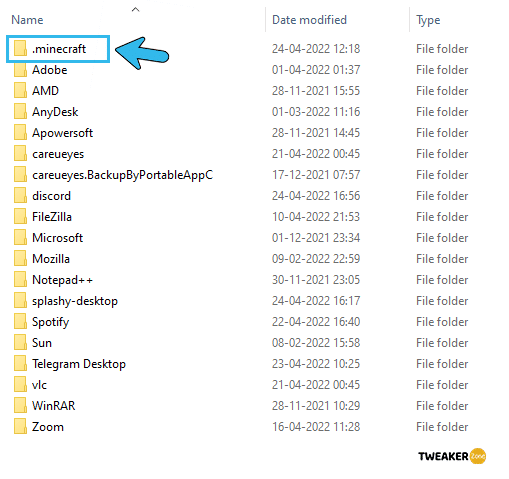
- Step 8: Completely remove the folder by pressing “Shift Key + Delete” together.
- Step 9: Reboot your system and install a fresh copy of the game from the official Minecraft website.
It is better to shift your mods to a different location or create a copy before uninstalling the game. Besides, you can just reinstall all the mods on the fresh copy of the game as well.
6. Connect Directly To LAN Server
Many times, the game itself can’t fetch the correct LAN server. But you can directly join the LAN server on a secure private network just by obtaining the right IP and port number.
- Step 1: Click on the “Magnifying Glass” icon on your taskbar and type “CMD” to launch the command prompt window.
- Step 2: Once the CMD opens up, type “ipconfig” and hit enter.
- Step 3: Note down the “IPV4 Address” located under the “Ethernet Adapter” heading.

- Step 4: Exit from CMD and launch Minecraft on the host server.
- Step 5: Navigate to the “Local game hosted on port XXXXX” at the bottom of the welcome screen and note down the five-digit number.
- Step 6: Launch “Minecraft” from other computers and choose the “Multiplayer” option.
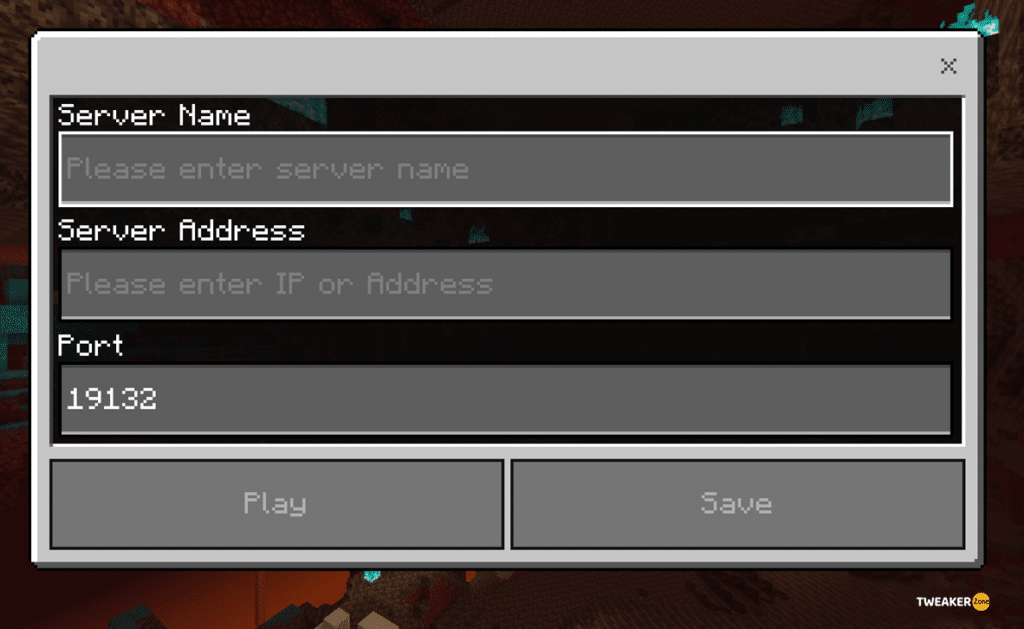
- Step 7: Click on the “Direct Connect” button and type the “IPV4 Address” and “Port Number” you have already noted. (E.g., 192.168.1.1:25505)
Many gamers have reported getting gateway errors when they try to connect to a LAN server directly. In such issues, you should follow our complete guide to Fix The Internal Exception: Java.IO.IOException Error In Minecraft in Windows.
7. Allow Minecraft On Windows Firewall
Windows Firewall can detect malicious connections and abort them from making any contact with your system for security reasons. But it can block the LAN network as well. You can manually whitelist the game to bypass this protocol.
- Step 1: Click on the “Magnifying Glass” button on your taskbar and type “Control Panel” to launch the window.
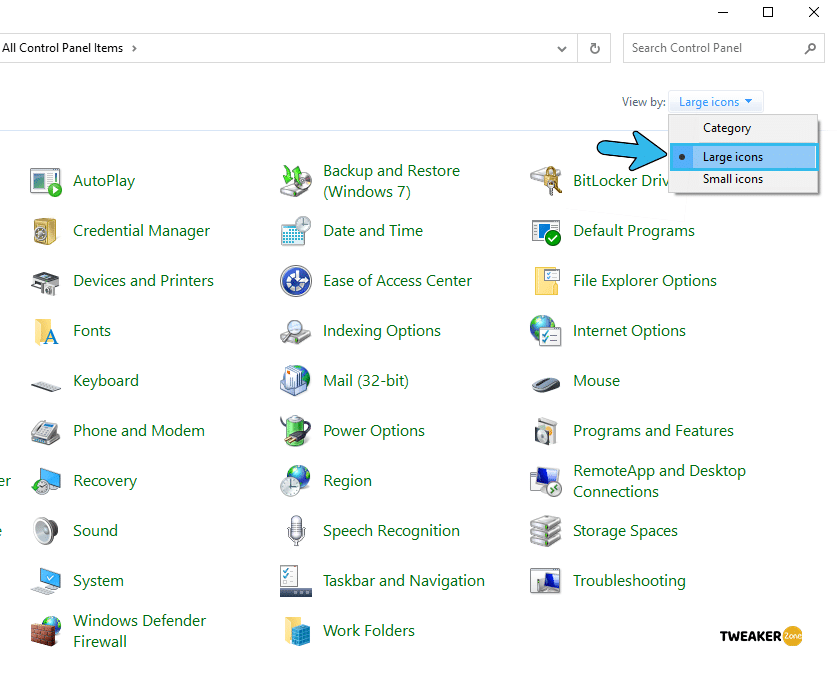
- Step 2: Click on the drop-down menu beside the “View by” option at the top-right corner and select the “Large icons” option.
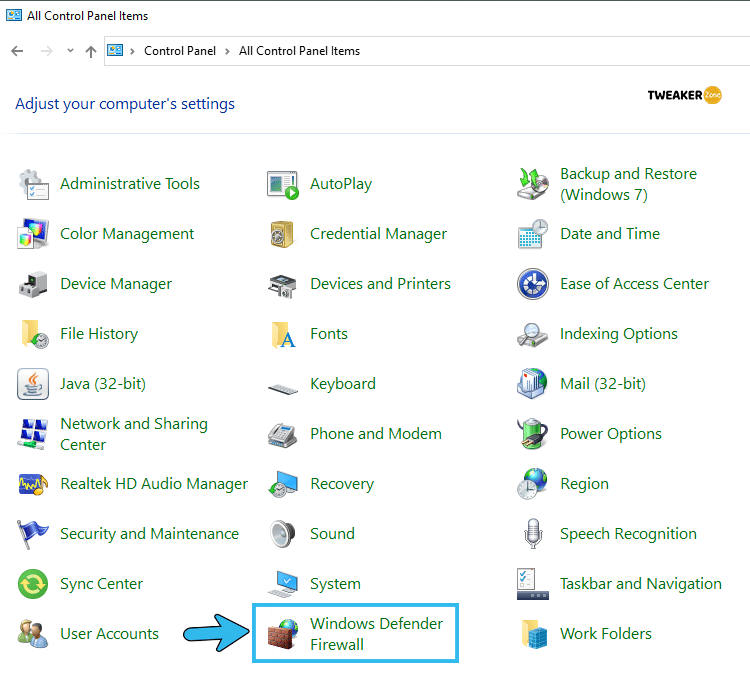
- Step 3: Navigate to the “Windows Defender Firewall” option and click to open it.
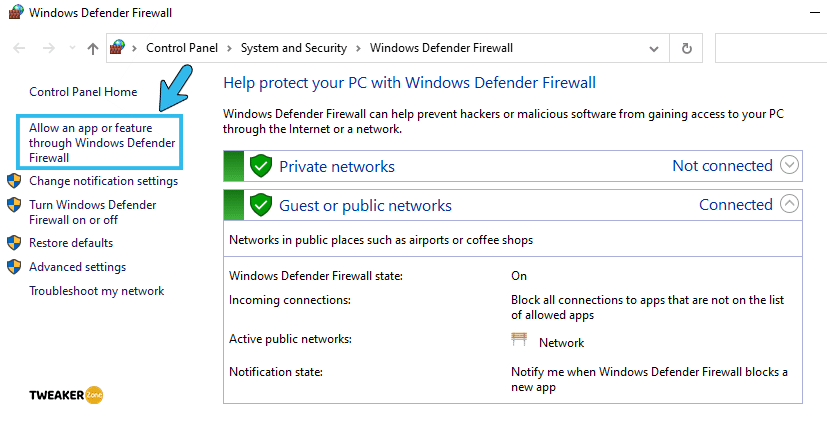
- Step 4: Once the new window pops up, click on the “Allow an app or feature through Windows Firewall” option on the left column.
- Step 5: Click the “Change Settings” button to open the complete list of allowed apps.
- Step 6: Scroll down and tick each box besides the “Minecraft,” “javaw.exe,” and “Java (TM) Platform SE binary” options.
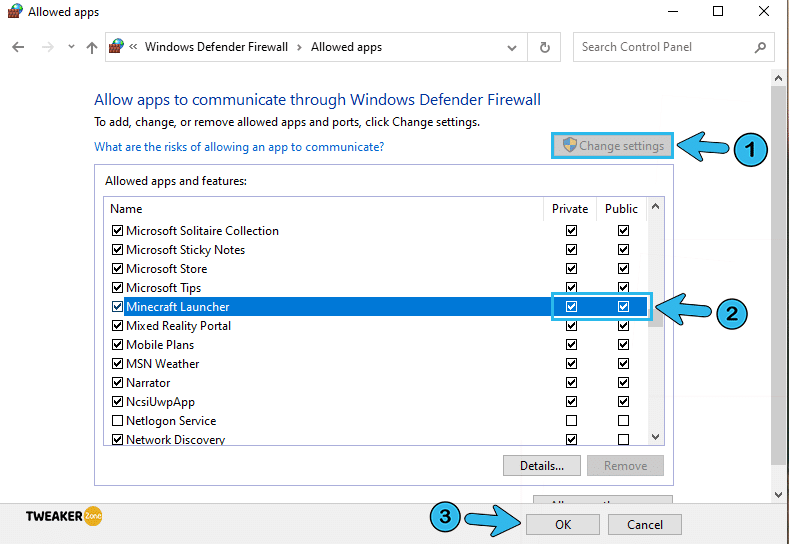
- Step 7: Click on the “OK” button to save the settings and close the application.
- Step 8: Launch Minecraft and try to directly connect to the LAN server by manually entering the IP and port number.
If you are using any other third-party firewalls, you should whitelist Minecraft from that as well. Besides, you can also completely disable the firewalls while playing the LAN game.
8. Disable Access Point Isolation
If your Minecraft LAN server is not showing up, your router may have triggered a security feature called access point allocation, especially if you use a Wi-Fi connection. You should manually disable that feature and retry!
- Step 1: Open any browser and type the IP address of your router. (The default is 192.168.0.1 in most cases, or refer to the manufacturer of your router)
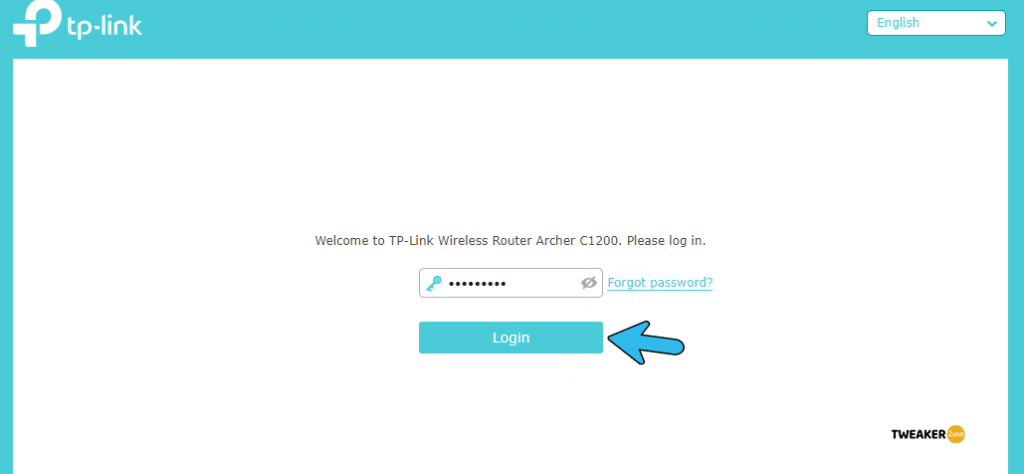
- Step 2: Log in to your router with proper credentials (Admin ID and password) and go to the “Wireless” menu> Advanced Settings.
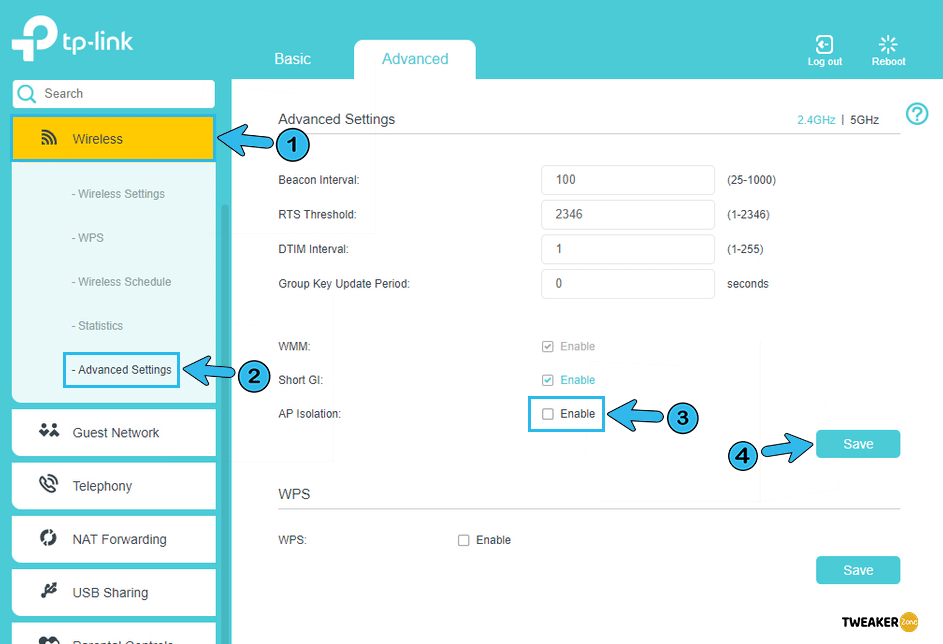
- Step 3: Scroll and find the “AP Isolation” option.
- Step 4: Toggle the switch beside the access point to disable it.
- Step 5: Save the settings and relaunch your game.
Depending on your model and manufacturer, the “AP Isolation” can also be demarked as “Access point isolation,” “client isolation,” or “user isolation.” Many modern-day routers also have a feature called “wireless access point isolation,” which acts similarly to AP isolation.
9. Disable All Minecraft Mods
Mods are quite an excellent add-on for any game, not just Minecraft. From skins to new landscapes, mods can really do wonders. But many people reported getting LAN errors for their buggy mods.
- Step 1: Click on the “Minecraft Launcher” to open the game and navigate to the “Profile Editor” option from the welcome screen.
- Step 2: Find and click to select the profile with all the third-party mods installed.
- Step 3: Right-click on the profile name and click on the “Delete profile” option.
- Step 4: Click “Confirm” once the new window appears and follow the on-screen instructions.
- Step 5: Once the profile is deleted, exit the game and launch the “Run” window by pressing the “Windows Key + R” buttons.
- Step 6: Type “%appdata%” to open the “Roaming” folder under the “App Data” root directory.

- Step 7: Navigate to the “.minecraft” folder and select the “version” folder inside it.
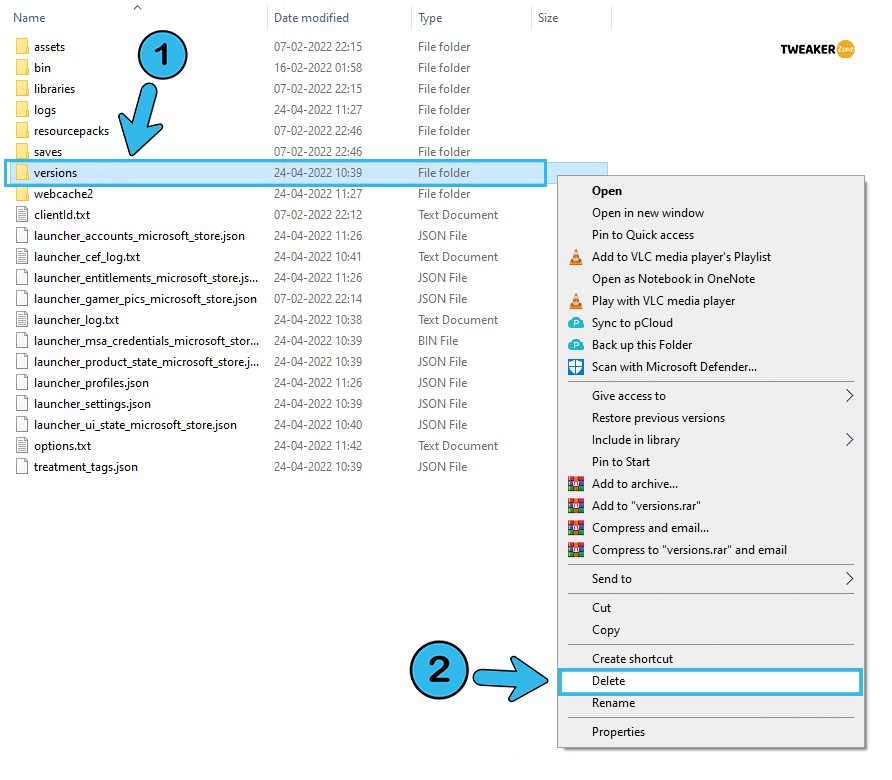
- Step 8: Press “Shift + Delete” together or press delete by right click to remove the folder from your system.
- Step 9: Relaunch your game without any mods and try to connect to the LAN server.
Always stick to trusted sites and forums (e.g., OptiFine and CurseForge) to download Minecraft Mods. If you download Mods from any malicious site, it will not just create network issues but will also cause security loopholes on your system.
10. Use The Right Server Version
There are possibilities that you have two different versions of the game installed on your host computer and native computer. In such cases, you need to select the right version to connect to the host LAN server.
- Step 1: Click on the “Minecraft Launcher” icon to initiate the game.
- Step 2: Select the “Installation” tab from the welcome menu.
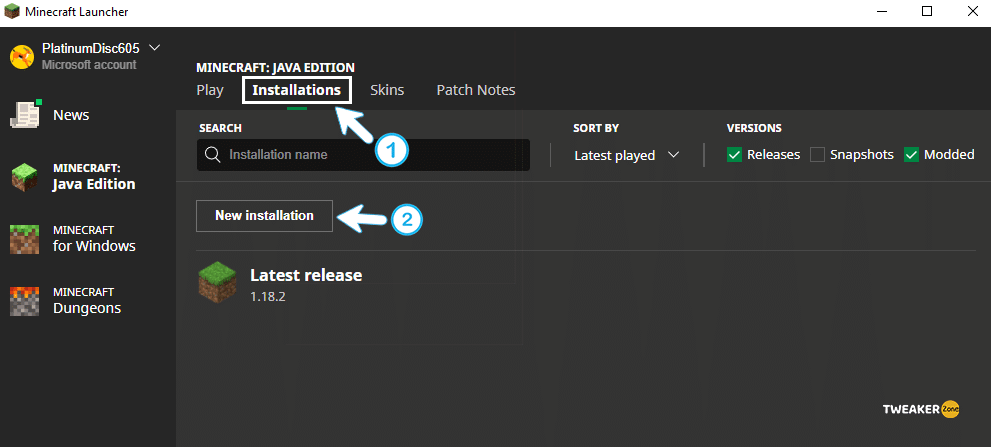
- Step 3: Click on the “New installation” option and select latest version. Give a name of the game in which the LAN server is also running.
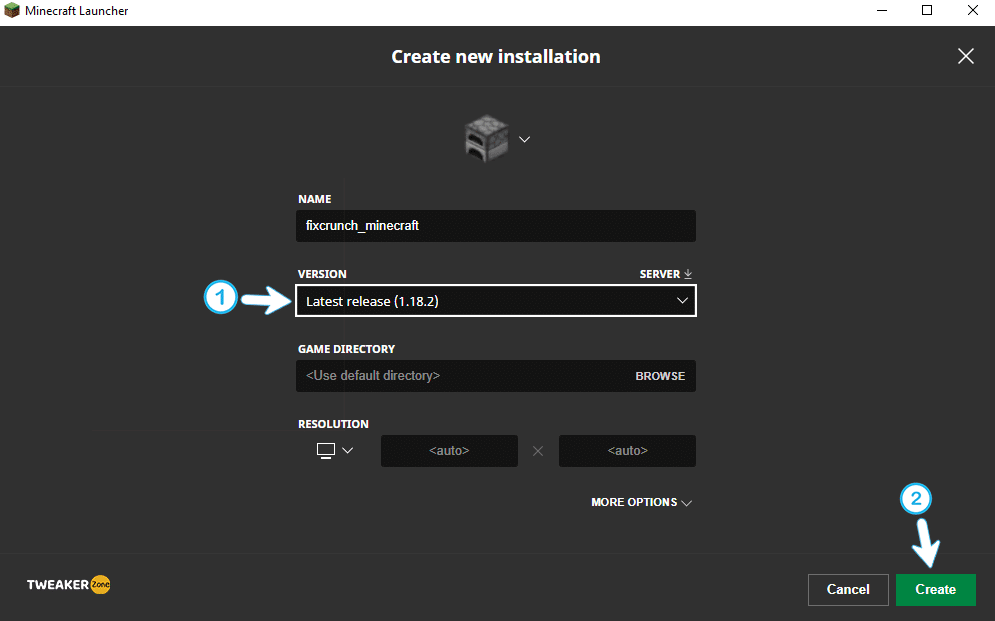
- Step 4: Click the “Create” button and shift to the “Play” tab.
- Step 5: Select the right game version which you have just added on the bottom-left corner.
- Step 6: Connect to the game server and check if the problem still persists.
Not just the updated one, you may also need to use the outdated version of Minecraft if your host computer is using it. So, always check for the version installed on the server computer to match it with the other computers on the same network.
FAQs
Q. Why is my Minecraft LAN not working?
This situation mainly triggers when the host and the native computers are not on a different network or using a different version of Minecraft. Besides, Windows Defender or Firewall can also restrict connection in the background. If you have disabled the network discovery option or access point isolation, this situation can also arise.
Q. Why can’t my friend join my Minecraft LAN?
First, check if both you and your friend are on the same network. And secondly, you should also turn on the network discovery option in both systems. Even if you are using an obsolete version of Minecraft itself or an outdated version of the network driver, this issue can also trigger.
Q. Why is LAN not working in Minecraft?
If you have disabled the multiplayer option from the root directory of Minecraft, the LAN option may not work. Besides, you may also have network issues, such as a disabled network discovery or an enabled AP isolation. Moreover, your antivirus or firewall application can also create interference with the LAN connection.
Q. How do you connect to LAN on Minecraft?
Launch Minecraft and go to the “Settings” option from the welcome menu. Click on the “Open to LAN” option and note down the IP address of the server. Now, open Minecraft from other computers, click on the “Multiplayer” button, and further proceed to the “Add Server” option. You can now join the host by entering the IP and the server’s name.
Conclusion
You should always install the updates whenever it is available for Minecraft and for the network driver you are using on your Windows system. Besides, it is better to temporarily disable the firewall and antivirus while hosting the game.
It is always better to try the general methods first if your Minecraft LAN is not working before resorting to any pro methods. Besides, it is also better to create a restore point to revert back to the previous setting if anything goes wrong. So, that’s all for today! If you have any queries, feel free to drop them in the comment box below.

Leave a Reply
View Comments