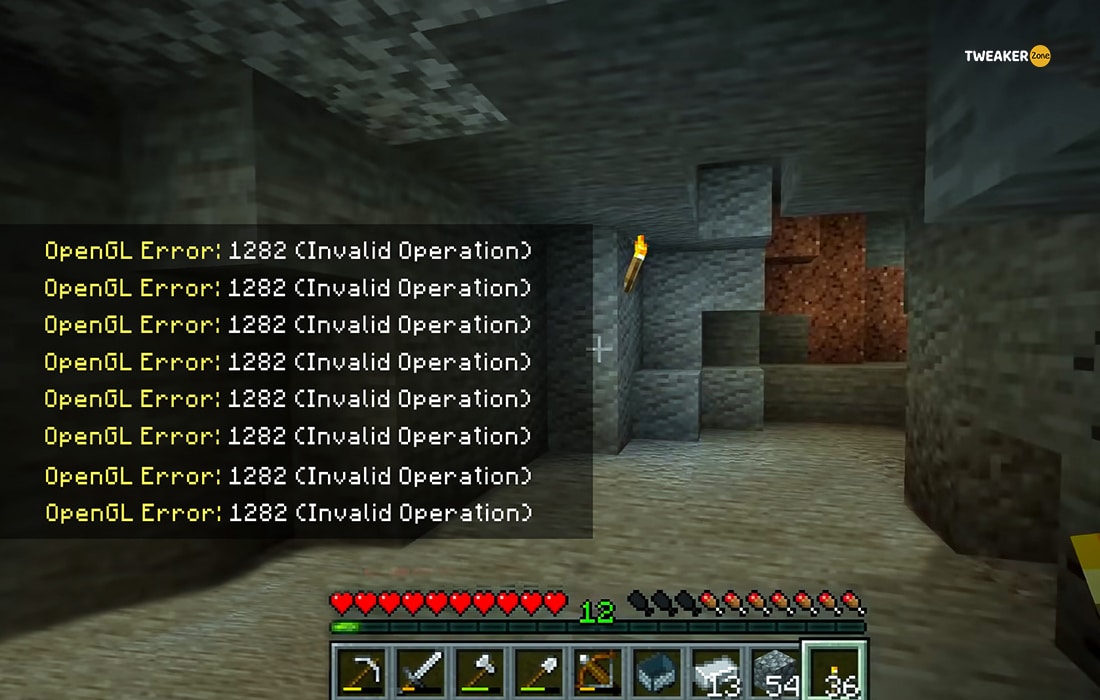
We all enjoy playing Minecraft in our free time. But our gaming experience gets seriously hampered once we start getting the OpenGL error 1282 followed by a completely black screen. And this situation becomes even more annoying when it triggers while we are on a LAN party, isn’t it?
You should install the latest version of Java, your GPU driver, and Minecraft to resolve the error 1282 in OpenGL. Besides, you can also disable your antivirus and the OptiFine mod from the in-game settings. You can also disable shaders and render regions to eliminate this issue.
The OpenGL error code 1282 typically triggers if you are using an obsolete version of Java, GPU driver, or the game itself. Besides, it can also trigger if the OptiFine mod is outdated or the antivirus is constantly interfering. This issue can even arise if the OpenGL32.dll file is missing.
However, you don’t need to worry, as there are some generic fixes and some advanced fixes to resolve this issue in no time. But before we concentrate on the solutions, let’s understand what this error is all about!
Table of Contents
What Are The Primary Causes Of OpenGL Error Code 1282 In Minecraft?
Getting an OpenGL error is not uncommon in Minecraft, although it can be easily solved. And you may encounter OpenGL error 1282 invalid operation in Minecraft for various reasons. But considering a broader spectrum, this issue can trigger for six main reasons.
- You are using an obsolete version of the GPU driver, or your GPU itself is below the minimum requirement.
- You are using an outdated version of OpenGL that is conflicting with your game.
- The OpenGL version you are using is interfering with the outdated version of Windows OS.
- You are using malicious mods that conflict with the root game files.
- You are using an outdated version of the OptiFine Mod.
- The java program installed on your Windows system is outdated and needs an update.
Developed by the Khronos Group, OpenGL is truly a great programming interface. However, it can create various issues if you are not updating it in timely intervals. So, you should also enable the automatic update to deliver a better hardware acceleration.
4 Quick Fixes For The OpenGL 1282 Error
There are four major generic fixes available that not just solve the OpenGL error 1282 but many other graphics-related issues as well. So, before you resort to any advanced methods that need technical tweaks, try these general fixes first.
1. Update Minecraft
Although it is hugely popular around the world, Minecraft is still not perfect in terms of security loopholes and other bugs. And the Mojang developers roll out frequent updates to deal with those errors. So, updating the game itself can solve not just this OpenGL error but a lot of other things.
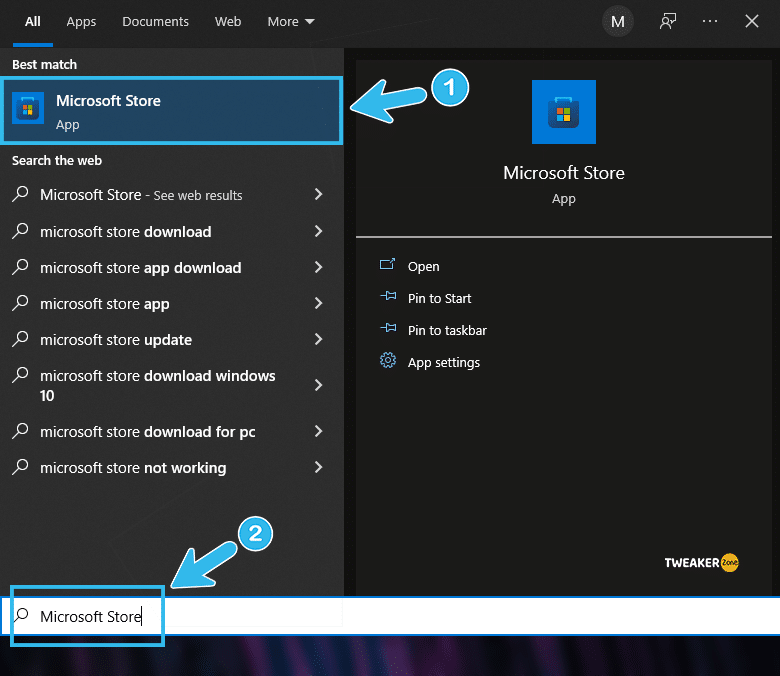
- Step 1: Click on the “Magnifying Glass” icon located at the bottom-left corner of your taskbar and type “Microsoft Store.” (You can also alternatively click on the “Shopping Bag” icon)
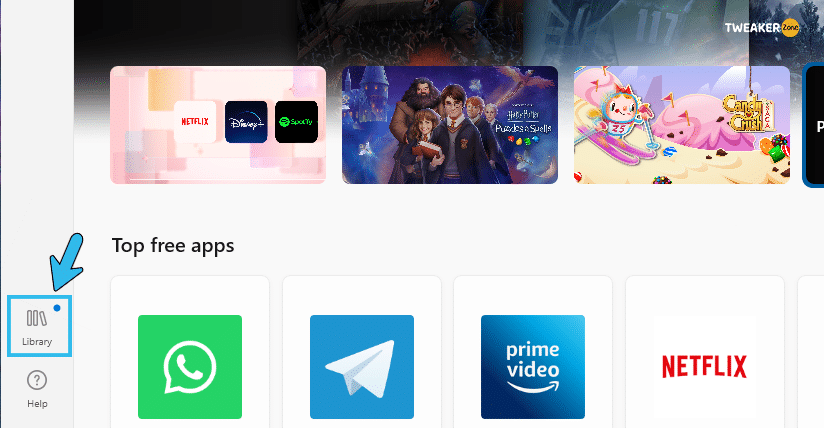
- Step 2: Locate the “Library” icon on the left side.
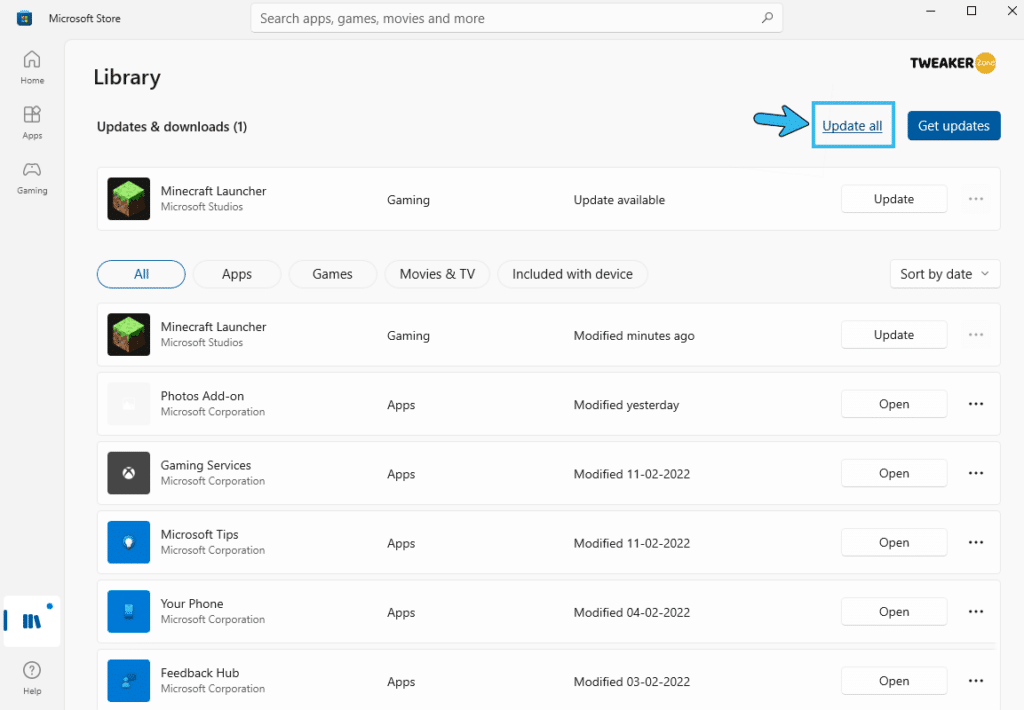
- Step 3: Once the new window pops up, scroll down, and click on the “Updates and Download” option.
- Step 4: Just click on the “Update” button.
- Step 5: Let windows search automatically for every available update from the internet and install those.
- Step 6: After the “Your apps and games are up to date” message pops up, restart your system, and relaunch the game.
If you are not using Windows 10 or later versions, you can alternatively update the game from the in-game settings itself. Besides, you can also visit the official forum of Minecraft to download and install the latest update manually.
2. Update GPU Driver
Not just the error code 1282, most of the OpenGL errors are mainly triggered due to faulty or obsolete GPU drivers installed on your system. So, before you resort to anything else, update your GPU driver ASAP to solve this graphics-related issue.
- Step 1: Right-click on either the “Windows” icon or the “Start” button, depending on your OS version, to expand the additional menu.

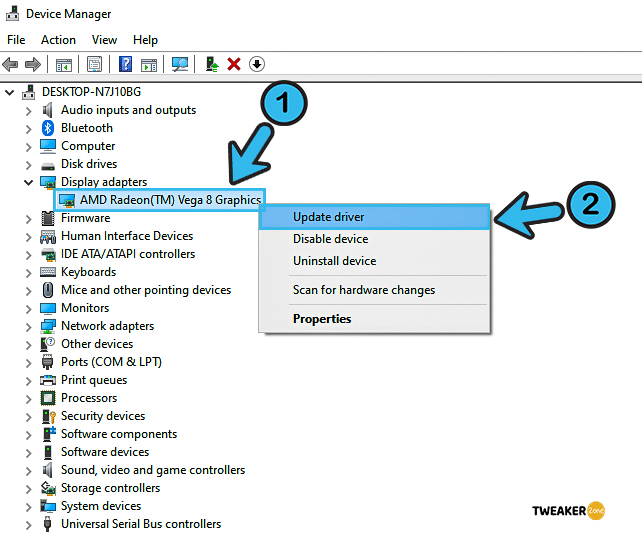
- Step 2: Click on the “Device Manager” option to launch the new window and click on the “Display Adapter” option.
- Step 3: Once it expands, find your GPU from the list, and right-click again to select the “Update Driver” option.
- Step 4: Select the “Search automatically for drivers” option from the newly launched window and follow the on-screen instructions.
- Step 5: Update all the available drivers and restart your system.
3. Update Java
Java is not just the backbone of your system but also plays a crucial role in the smooth gameplay of Minecraft. And if you are using an outdated version of Java, the OpenGL error draw nodes: 1282 invalid operation can definitely trigger.
- Step 1: Right-click on the “This PC” icon on your desktop and click on the “Properties” option from the menu.
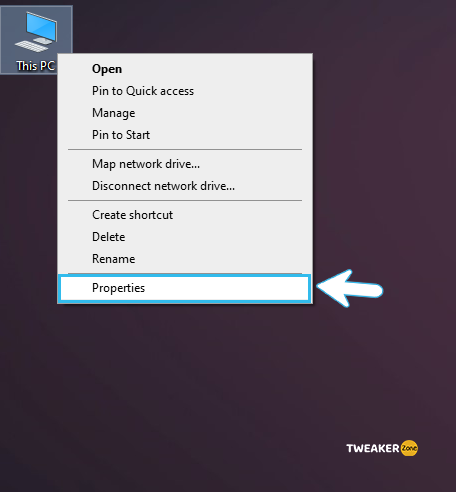
- Step 2: After the “About” window opens up, note down the architecture of your OS (either 32-bit or 64-bit) displayed beside the “System Type” option.
- Step 3: Now close that window and visit the official Java site to download the compatible update for your OS architecture.
- Step 4: Once the setup file is downloaded, double click to initiate the updating process and follow the on-screen instruction.
- Step 5: Once the update is installed, copy the entire folder from the root directory.
- Step 6: Come back to your desktop and press “Windows Key + E” together to launch the “Windows Explorer” menu.
- Step 7: Navigate to either “C:\\Program Files\\Java” (32-bit)” or “C:\\Program Files (x86)\\Java” (64-bit) on windows explorer.
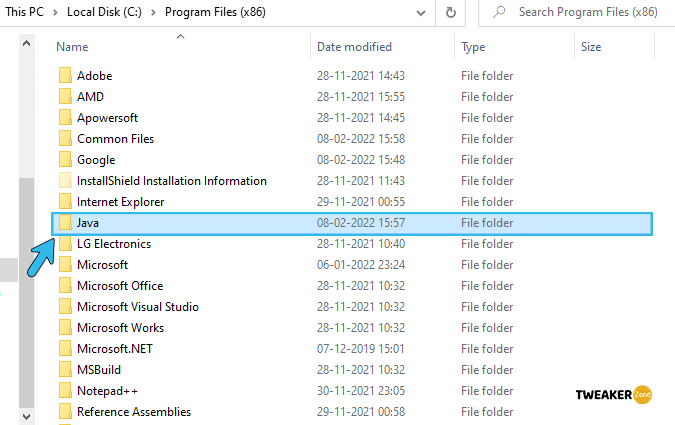
- Step 8: Paste the folder which you have copied already and click on the “Replace All” button once the popup appears.
- Step 9: Come back to your desktop again, launch “Minecraft,” and select the “Forge MOD Manager” option from the welcome screen.
- Step 10: Select the “Edit Profile” option from the new menu and assign the correct Java path on your system under the “Java settings (Advanced)” option.
- Step 11: Save the settings and relaunch your game.
4. Disable Windows Defender
Windows Defender is definitely a robust security software that comes pre-installed in the latest Windows OS. However, it may block certain applications from interfering with the core files to minimize security hazards. So, you can manually disable it temporarily to check if the problem still arises.
- Step 1: Launch the “Settings” application by pressing the “Windows Key + I” together.
- Step 2: Once the new window opens, click on the “Update & Security” button to expand it.
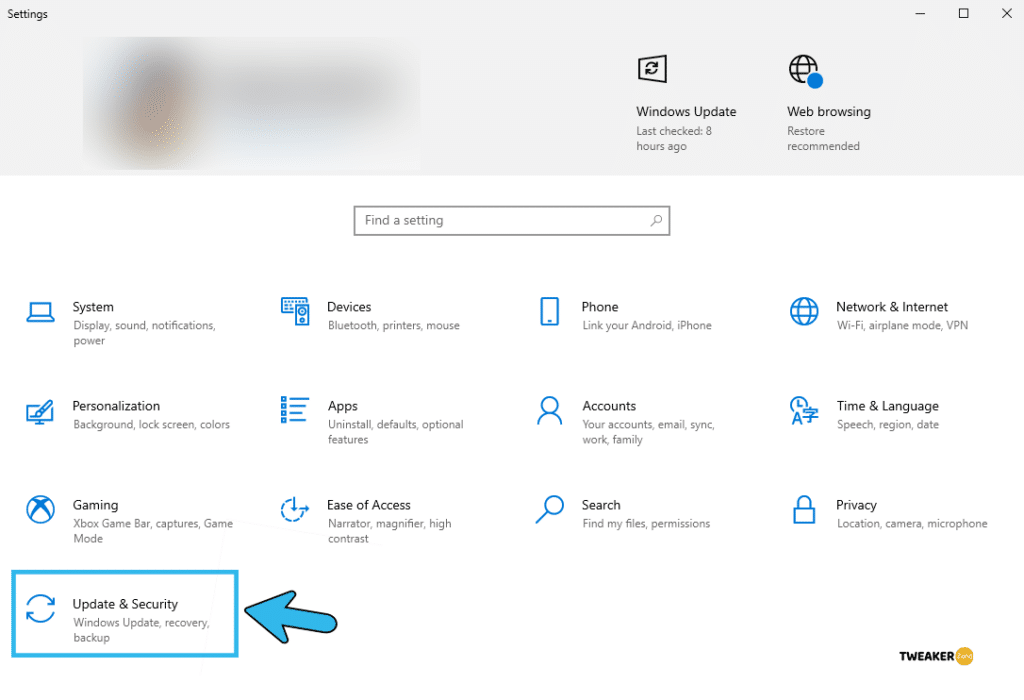
- Step 3: From the main panel, select the “Windows Security” option from the left-hand column.
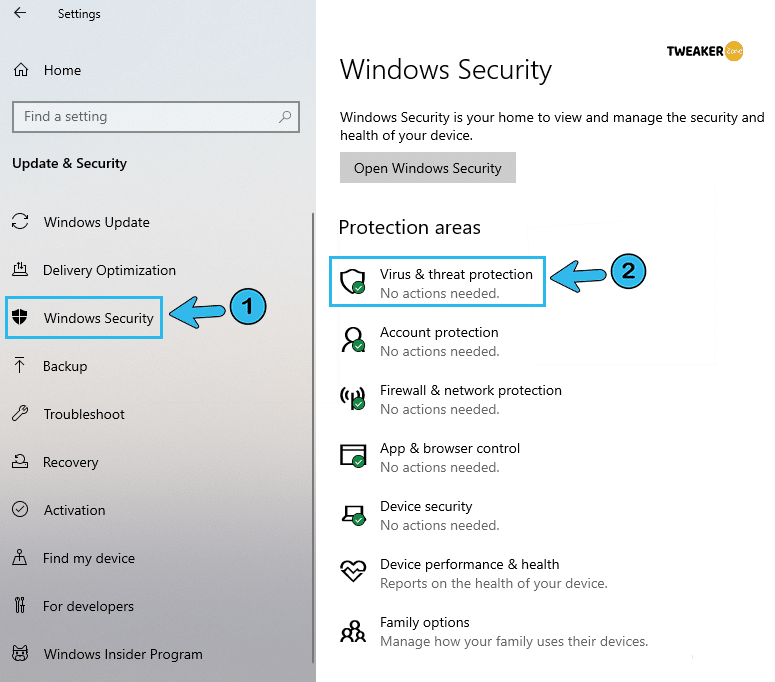
- Step 4: Once the new menu launches, click on the “Virus & threat protection” option.
- Step 5: Select the “Virus & threat protection settings” option from the newly launched window.
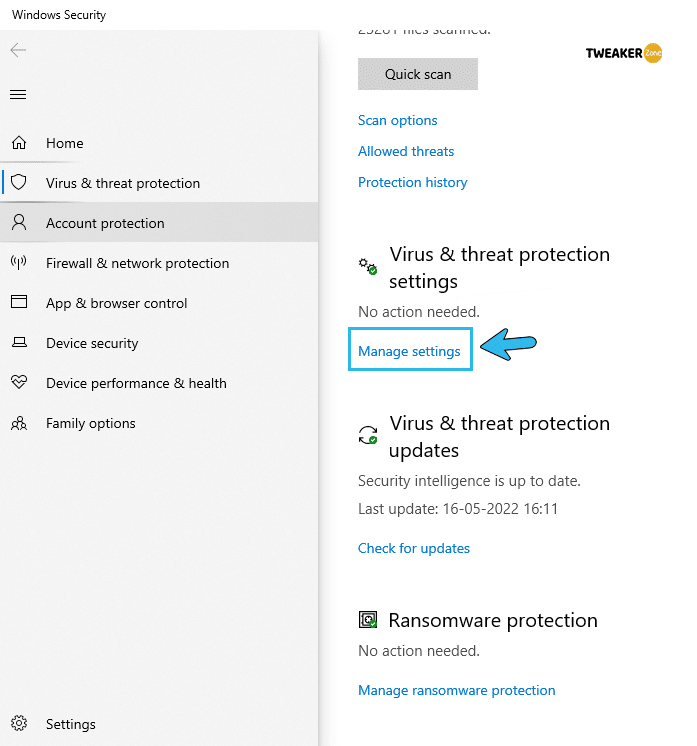
- Step 6: Scroll down, find the “Real-time protection” option, and toggle the switch to disable it.
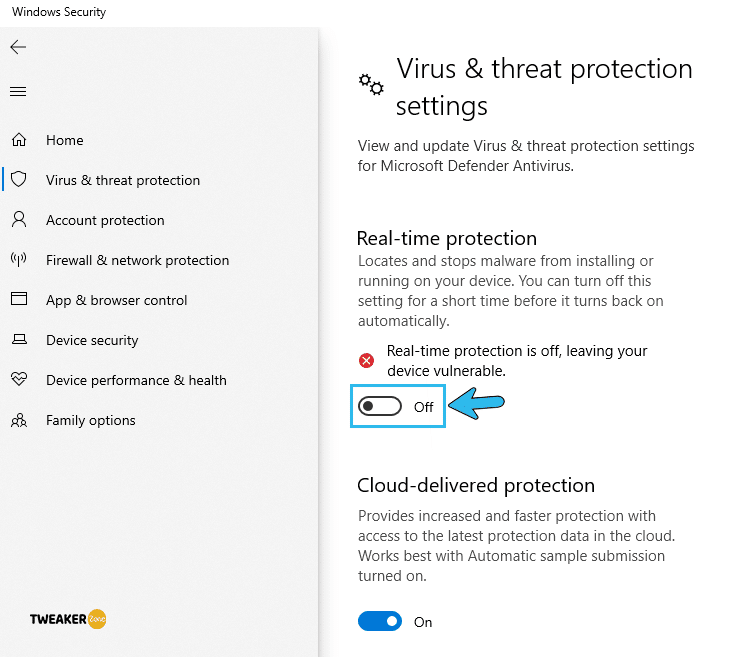
- Step 7: Save the settings and relaunch the game.
Your Windows Defender can still block certain applications if you are under a group moderator. In such cases, follow our complete guide to Fix OpenGL Error 1281 In Minecraft .
6 Advanced Fixes For The OpenGL 1282 Error
If none of the general fixes are working to resolve your OpenGL error 1282 in Minecraft, your problem may be way more deep-rooted than you actually assume. In such cases, implementing the pro methods is the sole option, although it requires some serious tweaks.
5. Manually Update OptiFine
OptiFine is not just the most popular mod in Minecraft trusted by millions of gamers, but it is also among the best-rated mod that ensures a superior rendering. However, an obsolete version of this mod can trigger OpenGL errors. So, you should update the mod at frequent intervals.
- Step 1: Open Google Chrome (or any other web browser), visit the official OptiFine Website, and click on the “Downloads” option located in the header section.
- Step 2: Navigate to the latest version of OptiFine listed on the menu and click on the adjacent “Download” button.
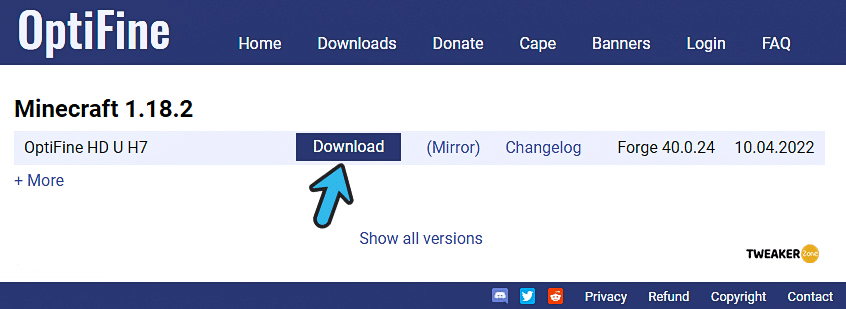
- Step 3: Let the “.jar” file download on your system and copy the entire file when it is done.
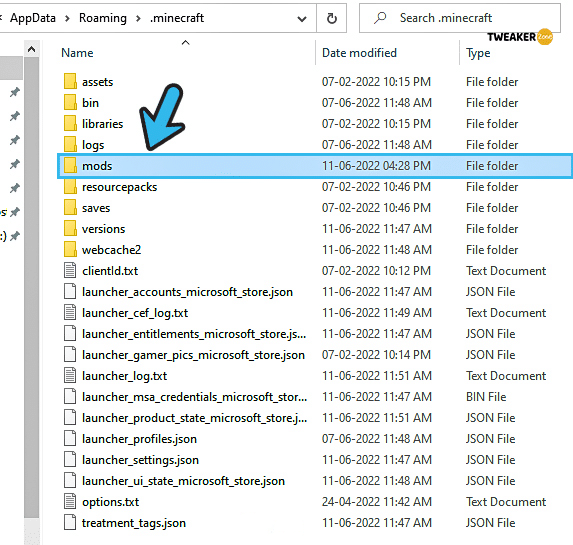
- Step 4: Launch the “Run” dialog by pressing the “Windows Key + R” together and type “%appdata%/.minecraft” to open the “Minecraft” folder under the “Roaming” directory.
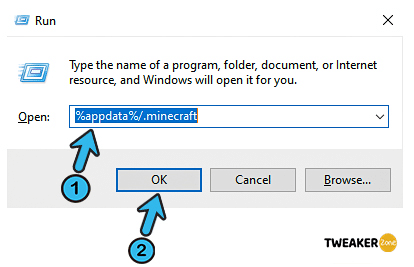
- Step 5: Find the “Mods” folder and paste the “.jar” file inside the folder which you have already copied.
- Step 6: Launch the game by double-clicking the “Minecraft Launcher” icon and then click on the “Arrow” sign just beside the “Play” option.
- Step 7: Once all the available option appears on the screen, select the latest version of OptiFine from that.
- Step 8: Save the settings and click on the “Play” button to launch a new game.
Several gamers reported getting an unexpected bug in the taskbar where it completely freezes and fails to respond.
6. Disable Shaders From Video Settings
You may face OpenGL error 1282 in Minecraft shaders if you are using a low-end graphics card below the optimum requirement for the game. However, you can manually disable all the shaders in the game to ensure bug-free gameplay.
- Step 1: Launch the game by double-clicking the “Minecraft Launcher” icon on your desktop.
- Step 2: In the mode selection menu on the welcome screen, select the “OptiFine” option.
- Step 3: Choose either the “Single Player” or “Multiplayer” option and let all the maps load in your new game.
- Step 4: Once the game starts, press the “Esc” button to open the settings option and click on the “Options” button from that.
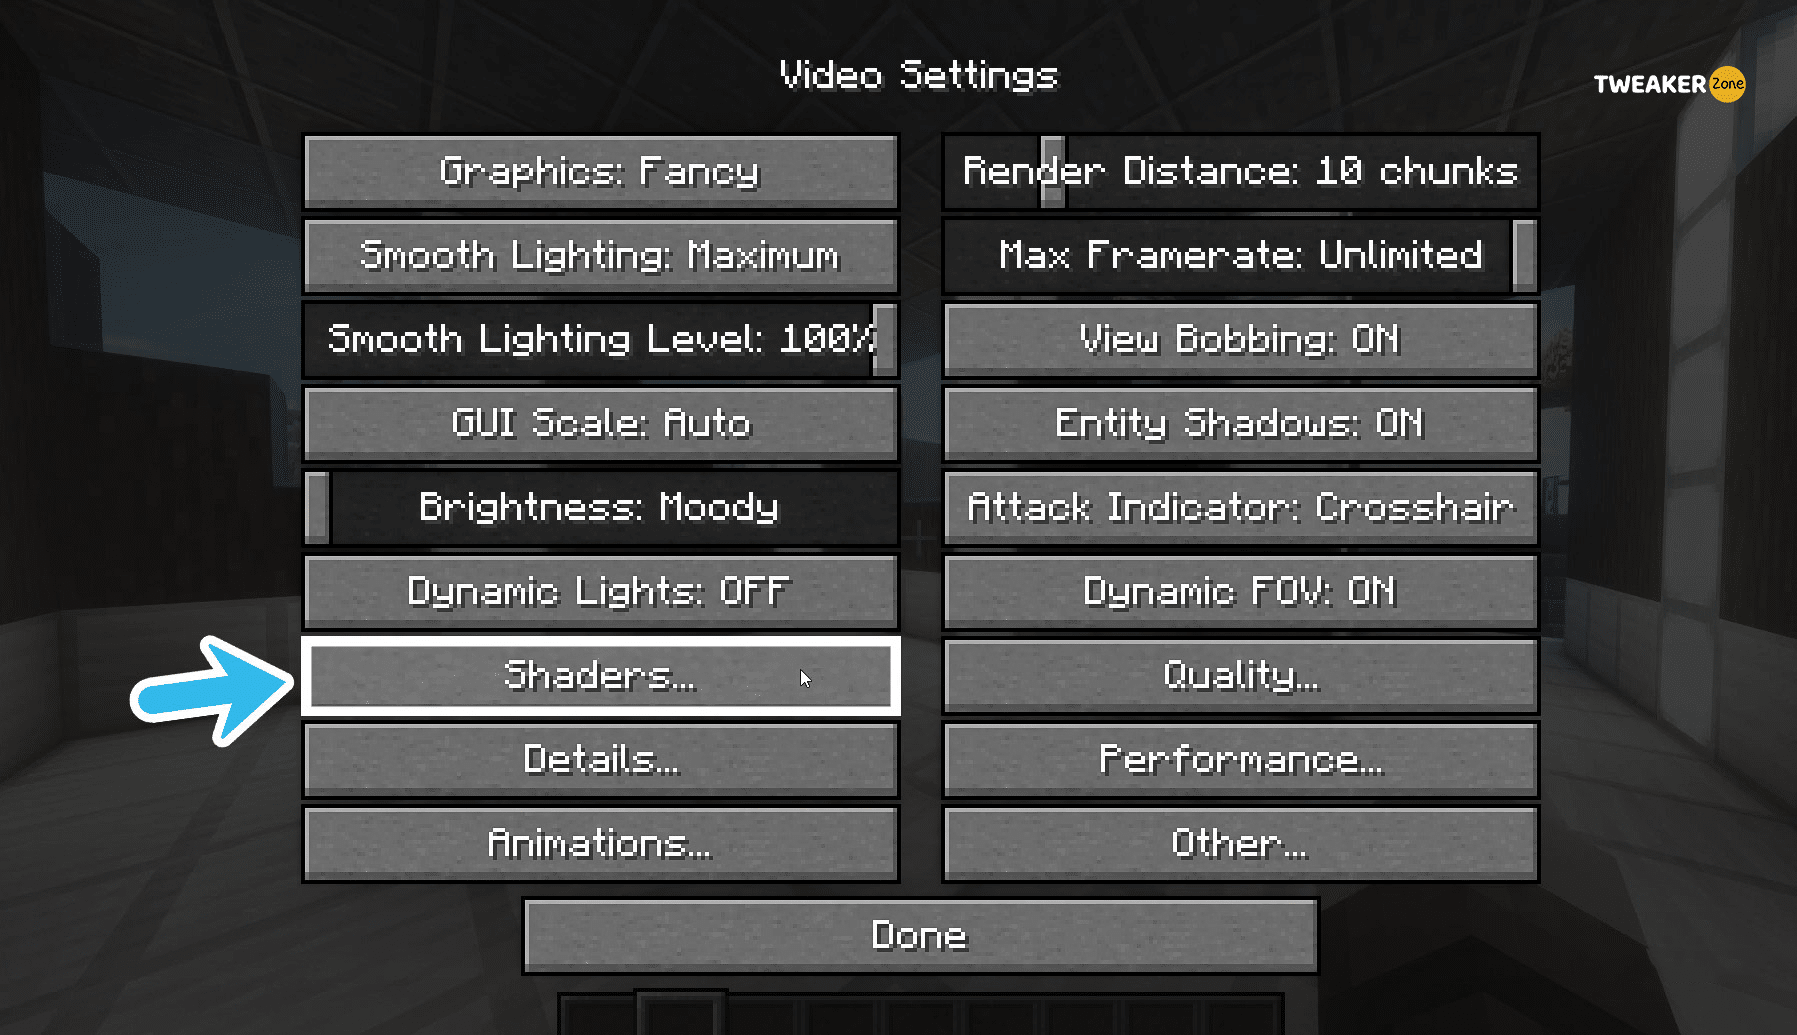
- Step 5: Further navigate to the “Shaders” option and click on the “Off” button to disable it.
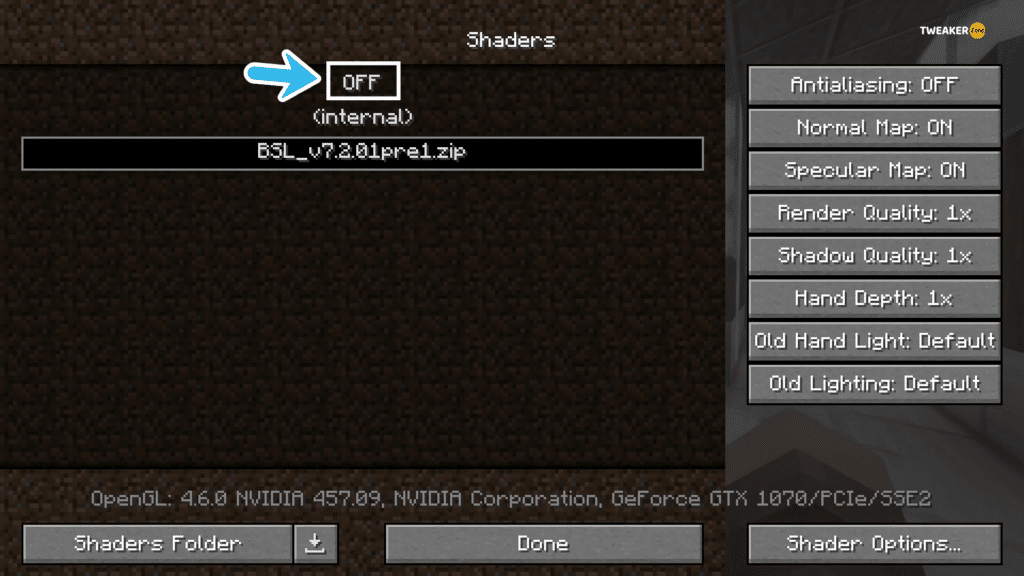
- Step 6: Click on the “Done” button to save it and relaunch Minecraft.
If you disable shaders, you may face several graphics-related issues, such as a broken bow or a wrongly rendered background. You can follow our step-by-step guide to repair bows in Minecraft on Windows systems in such cases.
7. Disable Render Regions From Video Settings
Besides shaders, render regions are also core vitals that can create trouble, especially in OpenGL. In such cases, you need to update your graphics card altogether to match the optimum requirement or can manually disable the render region from the in-game video settings.
- Step 1: Double-click on the “Minecraft Launcher” button to initiate the game and select the “Single Player” or “Multiplayer” option from the welcome screen.
- Step 2: Hit the “Esc” button once the game starts to open the in-game settings menu.
- Step 3: Select the “Options” button from the menu and select the “Video Options” from that.
- Step 4: After the video menu opens up, click on the “Performance” option.
- Step 5: Click on the toggle switch located beside the “Set Render Regions” option to off.
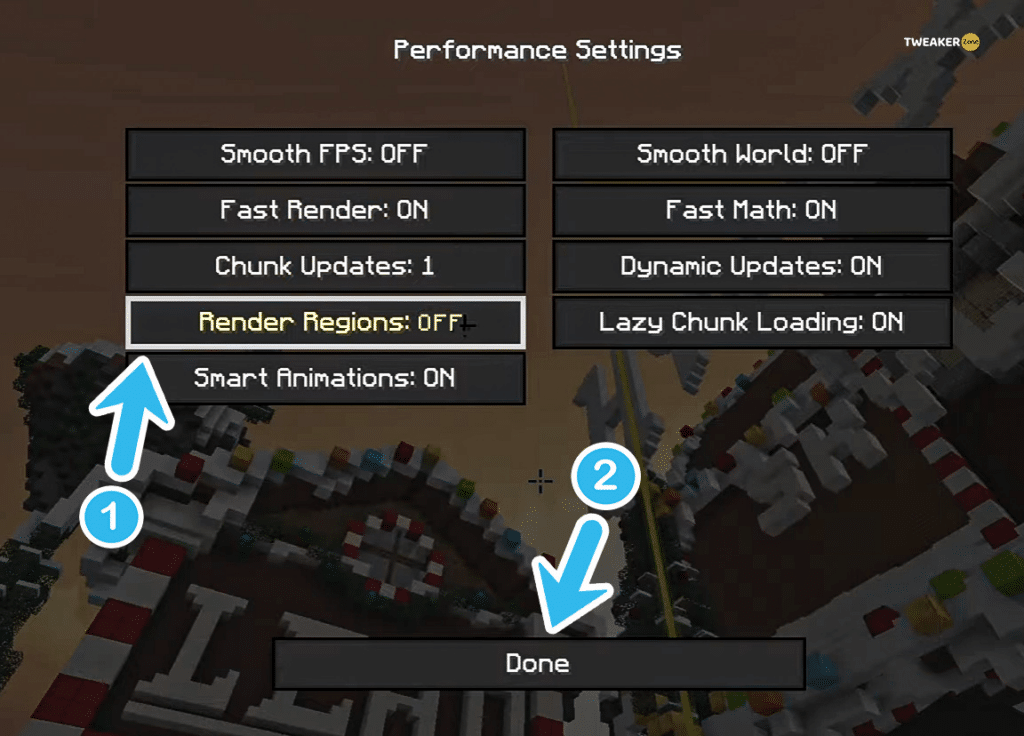
- Step 6: Click on the “Done” button to save the settings and relaunch your game.
You may feel a slight lag in gameplay or a jittery screen in a few patches if you disable the render regions permanently. So, it is better to update your GPU and enable it again to ensure the smoothest gameplay possible!
8. Decrease Render Distance
If completely disabling the render region isn’t your best bet, you can manually decrease the render distance to reduce the additional load from your GPU while playing Minecraft, especially if you are using a low-end one.
- Step 1: Double click on the “Minecraft Launcher” icon to initiate the game and click on either “Single Player” or “Multiplayer” to launch a map.
- Step 2: Hit the “Esc” button once the game starts and navigate to the “Options” section.
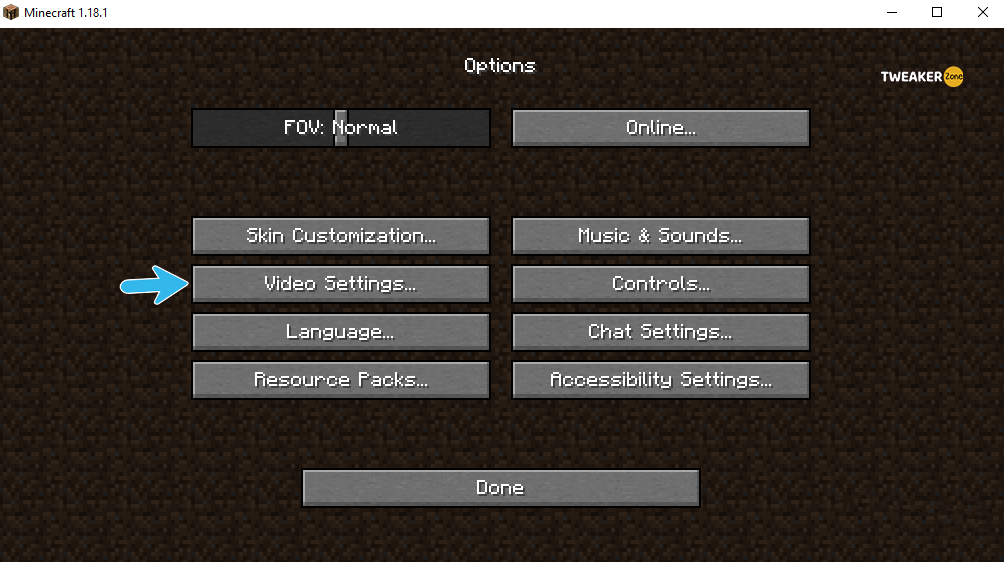
- Step 3: Click on the “Video Settings” option and navigate to the “Redner Distance” slider.
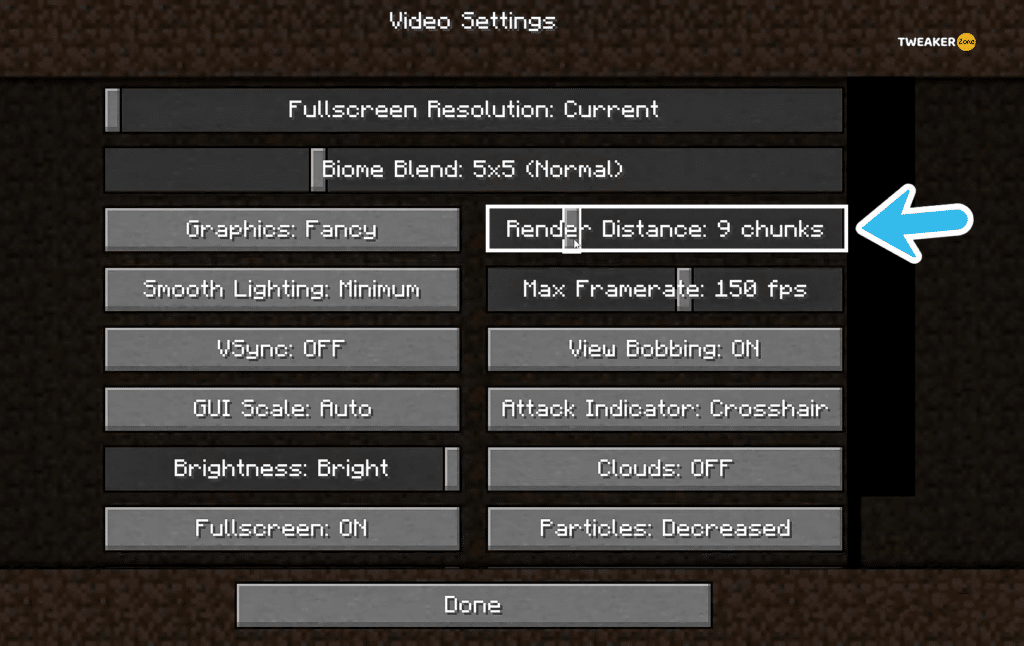
- Step 4: Hold the slider and drag it to your left-hand side to decrease the distance.
- Step 5: Click “Done” to save the settings and relaunch your game.
If you are using an old version of Minecraft, you may not get a slider but a numerical value instead beside the “Render Distance” option. In such cases, you need to set the value between 4 and 6 (the default numerical value is 10).
9. Manually Add OpenGL32.dll
The Minecraft OptiFine OpenGL error 1282 is bound to trigger if you have a wrongly configured DLL file in the root directory. Many gamers have also reported missing the Dll file completely from their system. In such cases, manually adding the OpenGL32.dll file is the only option.
- Step 1: Right-click on either the “This PC” or “My Computer” icon on your desktop (depending on your OS version) and select the “Properties” option from the menu.
- Step 2: Note down your OS architecture (either 32-bit or 64-bit) displayed beside the “System Type” option.
- Step 3: Open a web browser and go to the official website of DLL-Files or any other trusted third-party sites.
- Step 4: Download the compatible DLL file according to your OS architecture and copy the entire file.
- Step 5: Come back to your desktop, right-click on the “Minecraft Launcher” icon and click on the “Open File Location” option from the menu.
- Step 6: Once the root folder of “Minecraft” launches, find the “Runtime” folder and open the “JRE-x64” folder inside it.
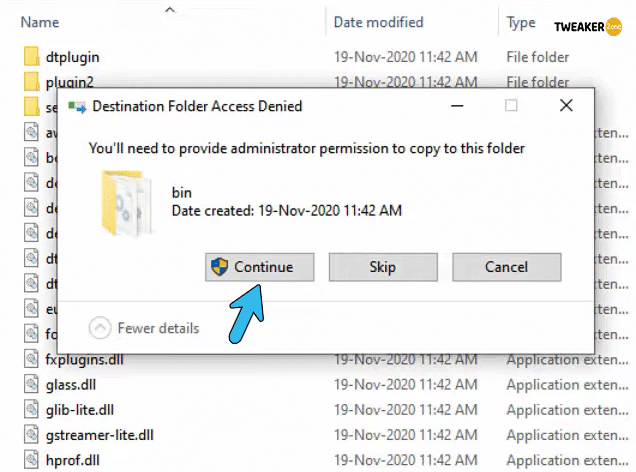
- Step 7: Find and open the “bin” folder inside it and paste the DLL file which you have already copied.
- Step 8: Restart your Windows system and relaunch the game.
10. Disable Showing OpenGL Popups
If none of the above methods (both generic and advanced) are working to resolve your OpenGL issue, you may need to disable showing the error popup completely from the in-game settings, as it is the only option remaining.
- Step 1: Double-click on the “Minecraft Launcher” icon and select either the “Single Player” or “Multiplayer” option from the welcome screen.
- Step 2: Hit the “Esc” button to bring the in-game settings menu once the map is loaded completely.
- Step 3: Navigate to the “Options” tab and click on the “Video Settings” option.

- Step 4: Click on the “Others” option and further select the “Show GL errors” option.
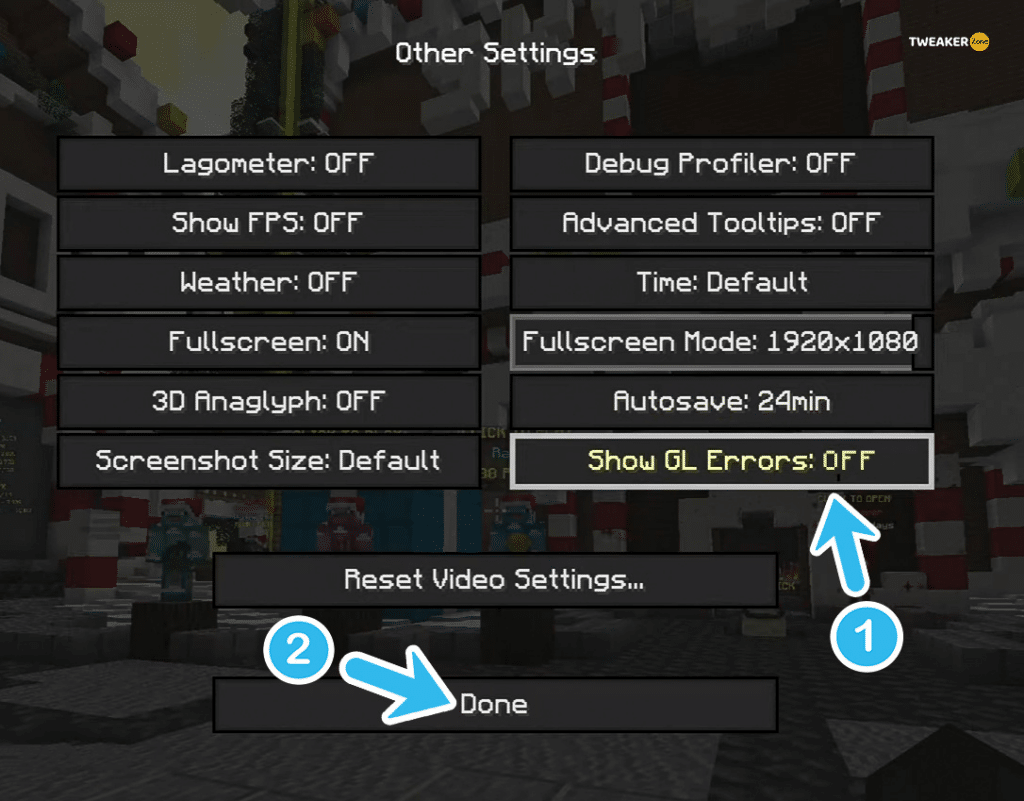
- Step 5: Click on the toggle switch to the “Off” position to disable it.
- Step 6: Click “Done” to save the settings and relaunch the game.
It is not recommended to disable the error message popup for a long time, as you may miss some critical errors that can create further problems in this game. So, once you identify the main cause and solve it, enable it again!
What Is OpenGL Error 1282 In Minecraft?
Before you try to identify the root cause and solve it in the right manner, you need to know what Minecraft OpenGL error 1282 actually is! Basically, there are two errors in OpenGL, 1281 and 1282, that can trigger on Minecraft, especially if you are using a low-end graphics card.
While the error code 1281 typically pops up randomly, the 1282 error code is mainly followed by a black or flickering screen. So, you may get a black screen and then the 1282 error message while playing Minecraft.
This error is mainly triggered when the dimensionality mod starts interfering with the shader mod. It can also trigger if the shader mod fails to load completely during the start-up of the game. However, any outdated mod can create this issue as well.
Conclusion
It is perfectly safe to follow the generic fixes. But, before you resort to any pro methods to fix the OpenGL error code 1282, you should create a restore point. It will protect your valuable saved games and other settings if anything goes wrong.
Have you found out any other solution we haven’t listed above? If yes, don’t forget to tell us about that in the comment box below! GG, folks!
FAQs
Q. How do I get rid of OpenGL error 1282?
You need to update your game, GPU driver, and Java application to get rid of error code 1282 in OpenGL. Besides, you can also manually download and include the OpenGL32.dll to fix this error.
Q. How do I get rid of OpenGL errors?
The best way to get rid of any OpenGL error is by updating your GPU driver, Windows version, and the game itself. Besides, you can also update Java on your system and disable the Windows Defender or any other third-party antivirus to fix it.
Q. How do I fix OpenGL error 1282?
First, try to update the OptiFine mod if you are using it. And secondly, you should disable the shader and render region to solve this issue. Several gamers also reported decreasing the render distance to fix this OpenGL issue.
Q. What does OpenGL error 1282 mean?
The OpenGL error code 1282 typically means that the dimensionality mod installed on your system is directly conflicting with the shader mod. It can also trigger if the shader mod fails to load completely during the start-up.
Leave a Reply
View Comments